This started as a weekend project. I had a Raspberry Pi 4, some spare hardware lying around, and a question: could I set up a fully automated CI pipeline that builds an automotive Linux image and validates it on real hardware — end to end, no manual steps — in a single day? And how many club-mates would it take?
The answer is 4, and here’s how it works.
AutoSD is the CentOS Automotive SIG’s Linux distribution aimed at in-vehicle software. It’s an ostree-based OS with a real-time kernel, built for the kind of reliability requirements you’d find in a car. I wanted a proper test setup: not just “does it boot”, but a fully automated pipeline that builds the image, flashes it to real hardware, and runs a test suite on every single push — no manual steps, no “works on my machine.”
The hardware target I had on hand was a Raspberry Pi 4. It’s not automotive hardware, but it’s close enough for CI purposes — ARM, real memory, runs the RT kernel. The project is at github.com/mmahut/autosd-rpi4-jumpstarter.
The CI Pipeline
The whole thing runs on GitHub Actions with two jobs that chain together.
                  git push
                      |
                      v
+---------------------------------------------+
|  Job 1: build-image                         |
|                                             |
|  1. Boot Fedora 44 KVM VM                   |
|     (osbuild needs SELinux xattr support)   |
|  2. Run automotive-image-builder inside VM  |
|  3. Produce autosd-rpi4-latest.raw          |
|  4. Upload image as GitHub artifact         |
+----------------------+----------------------+
                       |
                       | artifact: autosd-rpi4-latest.raw
                       v
+---------------------------------------------+
|  Job 2: test-on-hardware                    |
|                                             |
|  1. Download image artifact                 |
|  2. SD Wire: switch card to host mode       |
|  3. Flash image via Jumpstarter             |
|  4. SD Wire: switch card to Pi mode         |
|  5. Shelly Plug: cut power, restore power   |
|  6. Wait for SSH (up to 120 s)              |
|  7. Run pytest test suite                   |
|  8. Upload JUnit XML results                |
+---------------------------------------------+
Every git push to main runs both jobs. The second job won’t start until the first one produces a valid image. If the image build fails, no hardware is touched.
You can also run the whole thing locally without touching GitHub Actions at all:
# build the image (needs podman and a Fedora host for osbuild)
bash scripts/build_image.sh

# flash, boot, and test against the hardware testbench
pip install --extra-index-url https://pkg.jumpstarter.dev/simple \
  jumpstarter jumpstarter-driver-sdwire jumpstarter-driver-power \
  jumpstarter-driver-ssh jumpstarter-driver-http-power \
  pytest pytest-asyncio

pytest tests/test_flash_and_boot.py tests/test_autosd_health.py \
  -v --timeout=300 -m "not hardware_can"
The first local build is the slowest — it has to pull and construct the aib-build:autosd10-sig container image. After that, the container is cached and subsequent builds just run osbuild inside it.
Why Two Separate Jobs?
The image builder (osbuild) requires SELinux xattr support — a kernel feature that Ubuntu runners don’t have. The workaround is spinning up a Fedora 44 KVM virtual machine inside the GitHub-hosted arm64 runner and doing the build inside it. Awkward, but it avoids needing a dedicated build machine.
The test job runs on a self-hosted runner that’s physically wired to the testbench. It downloads the image artifact from job 1 and does the rest.
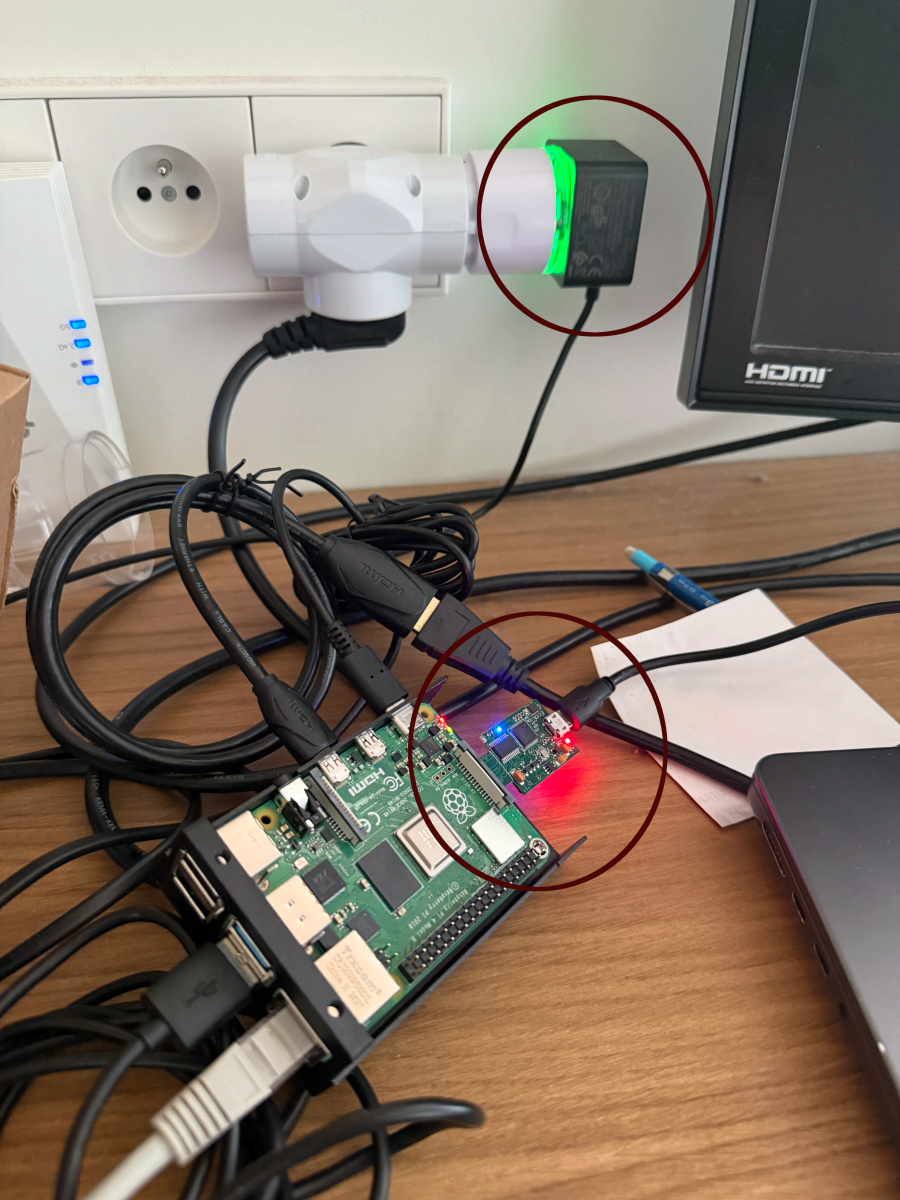
The Hardware Rig
Three pieces of hardware connected to the self-hosted runner:
- Raspberry Pi 4 (4 GB) — the device under test
- SD Wire (SRPOL SD-MUX) — a USB-controlled SD card switch that lets the runner write the image and then hand the card off to the Pi
- Shelly Plug S — a smart outlet that controls power over HTTP
The SD Wire is the key piece. Without it, flashing means physically swapping the card every time. With it, the runner flips the mux to host mode, writes the image, flips back to device mode, and the Pi boots from the freshly written card — fully automated.
One catch: the SD Wire I received came with an unprogrammed EEPROM, so it did not identify itself cleanly over USB out of the box. I ended up adding support for that path directly into Jumpstarter so the driver can handle boards that need the EEPROM programmed during bring-up. That work landed in jumpstarter-dev/jumpstarter#748.

Jumpstarter
Jumpstarter is a hardware-in-the-loop test framework from Red Hat. It provides Python drivers for controlling hardware: SD card muxes, power switches, SSH sessions. A fixture in conftest.py handles the full deploy sequence before any test runs:
@pytest.fixture(scope="session")
async def deploy(jumpstarter_client):
    async with jumpstarter_client as client:
        # flash the image
        await client.sdwire.host_mode()
        await client.sdwire.flash("autosd-rpi4-latest.raw")
        await client.sdwire.dut_mode()

        # power cycle
        await client.power.off()
        await asyncio.sleep(2)
        await client.power.on()

        # wait for SSH
        ssh = await client.ssh.wait_for_connection(timeout=120)
        yield ssh
Every test in the suite receives a live SSH handle to the booted device. No test touches the hardware directly — they all go through that fixture.
What the Tests Check
The test suite has three layers:
Boot and identity — does the device reach SSH within 120 seconds, does it identify as AutoSD/CentOS, and is the PREEMPT_RT kernel actually loaded?
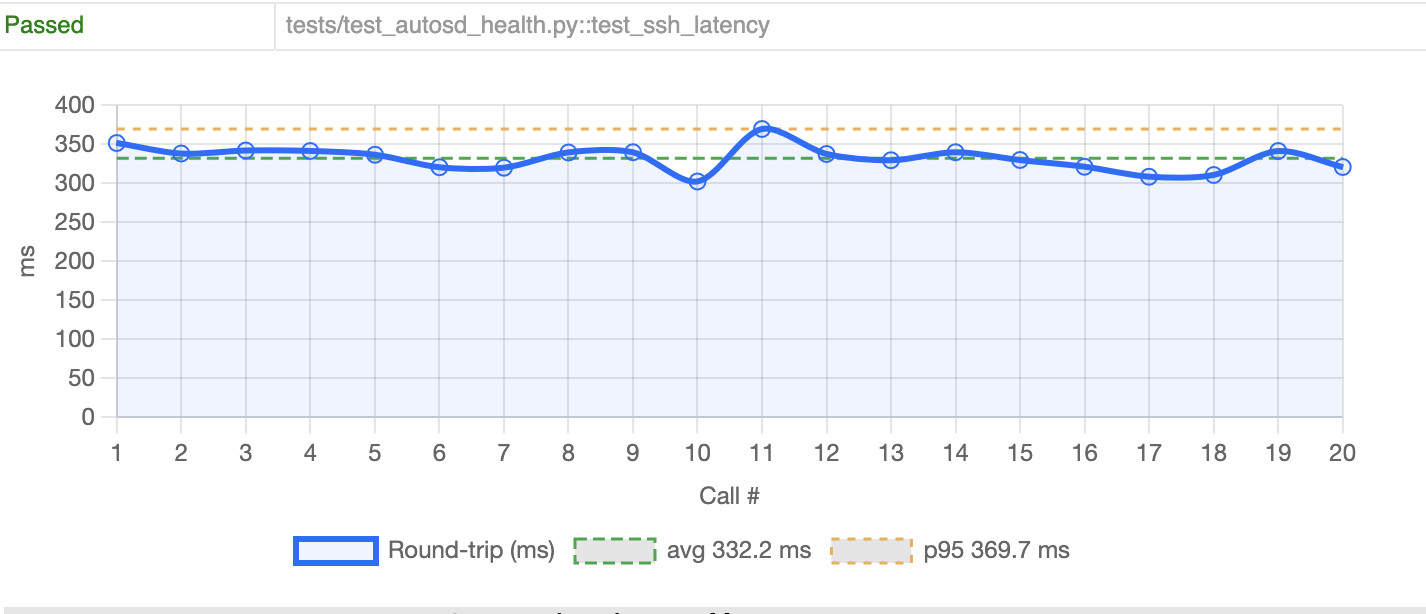
System health — CPU not thermally throttling, more than 512 MB memory free, podman working, filesystem writable, ethernet up, SSH round-trip latency under 2 seconds. The test makes 20 consecutive SSH calls and measures round-trip time for each. On this run: avg 332 ms, p95 370 ms — well within the 2000 ms threshold.
Real-time kernel — /sys/kernel/realtime reads 1, PREEMPT_RT is compiled in, SCHED_FIFO scheduling works, and cyclictest stays under 200 µs. Boot timing is also captured: kernel phase under 2 s, initrd under 10 s, userspace under 30 s.
The 200 µs cyclictest threshold is a soft-RT sanity check. The Pi 4 isn’t industrial RT hardware, but it should still demonstrate that the scheduler behaves predictably enough to be useful for development and validation work.
Why This Setup
The point isn’t to prove the Pi 4 is a car computer. It’s to have a repeatable, automated way to validate that AutoSD images boot correctly and the RT kernel behaves — without manually flashing an SD card every time someone changes the image recipe. A broken image gets caught before anyone even looks at it.
The same Jumpstarter framework and test structure would work on real automotive hardware. The Pi 4 is just a convenient stand-in that’s cheap, easy to wire up, and available. Getting the pipeline working here means the hard parts — automated flashing, power control, test harness — are already solved by the time you connect something more serious.
The full setup, including the GitHub Actions workflow, Jumpstarter exporter config, and test suite, is on GitHub.